
- Press the start button, Right click Computer and click Manage.
- Choose the partition that you want to reduce, right click the partition and select Shrink Volume, and then you enter the size in MB you want to reduce.
- Create a partition. In the unallocated space is where we create our new partition (Usually in black), right-click there and then and then New Simple Volume Wizard opens new simple volumes and press NEXT.
- Enter the space in MB for the new volume and click Next
-
Assign a letter to the Volume and click Next..

-
Select the type of format for the Volume and click Next.

-
To conclude, we review the information of the new volume, if it's OK then click Finish.

- 8Check and make sure the volume is correct. The new volume should appear on Computer and ready for use.


Top Songs Of 2012
The song has received positive reviews from critics who complimented the song’s effective lyrics and chorus, and commended Ludacris’ part and the song’s ability to have an urban twist.

Most Visited Websites 2011-2012
Google Search or Google Web Search is a web search engine owned by Google Inc. Google Search is the most-used search engine on the World Wide Web, receiving several hundred million queries each day through its various services.

History of Facebook
Mark Zuckerberg wrote Facemash, the predecessor to Facebook, on October 28, 2003, while attending Harvard as a sophomore. According to The Harvard Crimson, the site was comparable to Hot or Not, and "used photos compiled from the online facebooks of nine houses.
Airtel 3G 70% less in Kerala Plans
First time users please follow the steps as given below to go 3G in Kerala:- » Select network settings to "automatic" on your handset » Choose "3G only mode" and wait for network registration. » After registration and seeing 3G network on your handset, Select "Dual Mode" or "3G and 2G mode" to enjoy 3G .

Aakash Tablet is Available For Booking
You can Order your Aakash Tablet now. The long wait for Aakash Tablet is now over. Now you can book your Aakash Tablet online which will be delivered within a week from the day of booking. Aakash was the most awaited Indian Tablet, which took many people’s attention all over the world.
Showing posts with label Windows Tips. Show all posts
Showing posts with label Windows Tips. Show all posts
How to Manage Partitions in Windows 7


Labels:
Windows Tips
How to Install Windows 7
- If you want to save some money, then use the ISO image.
You can buy and download the ISO image, burn it to your DVD and then
install Windows 7 to your personal computer. The ISO image is not a
pirated software (see Warnings below), but a download instead of buying
the DVD. It's often less expensive that way.
- Turn on the computer and insert the Windows 7 DVD into your computer’s DVD drive where you can boot from it. Windows will start loading some files onto your computer and it will start the Windows setup page where you can start the installing. Make sure you choose to boot your computer from your DVD drive.
- If you are going to install Windows 7 to a computer with a different Operating System, then you should try to install Windows 7 on a different partition or use a Virtual Machine Software if you don’t use it a lot.
- After the Windows setup page starts it will ask you to read the Terms and Conditions of Windows 7. After reading it check the acceptance and click Next.
- A new window will open which ask what type of installation you want. Choose 'Custom installation'.
- Choose your partition. It's good to choose the first partition. Otherwise, choose whichever one you want.
- After clicking next, it will ask for the Serial and/or Product key. Enter the product key included in your package and click Next which will take you to the installation section.
- A new Window will appear and it will start copying all files you need for installation before installing everything on your computer. It may reboot every so often
- After everything is installed properly, a new page will open which will ask you to create a username and password for your Administrator user. Enter a username,Password and a hint for your password and click Next.
-
Now you can adjust the time zone, time and date and click Next which will now load and start your Windows 7.


Labels:
Windows Tips
How to Install Fonts on Windows 7
- Download a font. Search for free fonts and then download them. You can use FontSpace, DaFont, or any other font website.
- Find the location where you downloaded the fonts. Usually, it is the Downloads folder on your account (C:\Users\Username\Downloads).
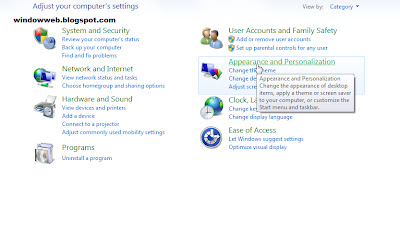
- Install the fonts. Open Control Panel, click on Appearance and Personalization, and then click on Fonts or, if you are on Large or Small icons view, simply double-click the Fonts icon (the yellow folder with a blue "A"). Drag the downloaded fonts to the Fonts window. Alternatively, you may select all the fonts that you downloaded, right-click on them, and then click Install.
Labels:
Windows Tips
How to Make an Audio CD With Windows 7
- Determine if your computer contains a CD burner.
There are 2 ways to determine if your computer contains a CD burner. If
your computer does not contain a CD burner, you must contact your
computer's manufacturer if you need help selecting a CD burner.

- Look on the front of the CD drive tray for a logo that indicates whether the drive offers "writable" or "rewritable" features. If the logo is present, then your computer contains a CD burner.
- Look at your CD drive properties in Windows. In Windows click on the "Start" button or Windows logo in the bottom left corner of your screen, then click on "My Computer." Right-click on your CD drive and select "Properties." Look for a "Recording" tab. If the "Recording" tab is present, you have a CD burner installed on your computer.
- Obtain a blank digital CD.
There are 2 different types of CDs you can use depending on the type of
CD player you have; Audio CDs or Data CDs. Audio CDs will store music
only and can play on any type of CD player. Data CDs will store music,
pictures and videos but will only play music on CD players that support
WMA files. Audio CDs have a capacity of up to 80 minutes of music,
whereas Data CDs have a capacity of up to 700 megabytes or 8 hours of
music.

- Purchase blank Audio or Data CDs in CD-R format because they are compatible with the widest range of CD players. If you plan on using a Data CD, you may also purchase the CD-RW format if you plan on erasing the CD or adding new files to it later on. You must also determine that your CD player supports CD-RW CDs.
- Burn your Audio or Data CD using Windows Media Player. Open Windows Media Player from your Start menu or from where it's stored on your computer.

- Click on the "Burn" tab in the upper-right corner, then click on the arrow below it or off to the right to display a drop-down menu with additional options. Click on "Audio CD" or "Data CD or DVD" depending on the method you have chosen.
- Insert your blank CD into your CD burner. If the "AutoPlay" dialog box appears, close it. If your computer has more than one CD burner, click on the "Next Drive" link to select the burner you want to use. If Windows Media Player does not recognize your USB-connected burner, check the connection or close and restart Windows Media Player.
- Find items in your music library you want to burn to the CD. In the main window of Windows Media Player, navigate to the music file or folder you want to burn to the CD. Click and drag these items over to the "List" pane on the right below the "Burn" tab. Drag and drop items up and down in the list if you want to change the play order. If you accidentally drag and drop a song you don't want, right-click the song and click "Remove from List."
- Click on the "Start burn" button at the top of the List pane to begin burning your CD. The burning process will take several minutes to complete depending on how many files you selected, and you may even be prompted to insert a second CD if your files will not fit on one CD.


Labels:
Windows Tips
How to Make Windows 7 Startup Faster
- Check start-up logs to identify potential system resource hogs. You can do this from Start menu by typing MSCONFIG in the search box, clicking the .exe file, then clicking the Startup tab.
- Any programs that you may have installed and allowed to run on Start-up will show in the Start > All Programs > Startup
- Find out which programs were installed by you. You can check the date of installation from Start > Control Panel > Programs > Programs and Features. Identify the third party applications you wish to remove or those that you do not need. Uncheck these in the Startup Manager.
- Disable Startup programs selectively by un-checking the application tick box under Startup.
Labels:
Windows Tips
How to Use Windows Speech Recognition
Speech Recognition Is a Program to open or use a windows thinks by your voice check it how to
open and use it
- Click On Start

- Then Speech Recognition

- Now you can open a think with voice
- Eg: by saying star you can open start bar
Labels:
Windows Tips


How Change your Windows Theme
- Click right click on mouse and select personalize

- Then select a theme

- you finished your steps
Labels:
Windows Tips
How to Set Password in Windows 7, VISTA, XP
- To Set or change password to your account or any account right click on “My Computer” icon and chose the “Manage” option.

- In the Computer Management windows chose the “Local Users and Groups” option.

- Now double click on Users folders and you see users in windows.

- To change the passwords of the user right click on the user and chose “set password” option.

- On the Set Password windows click on “Proceed” button.

- Now enter new password in the “new password field” and confirm password on “confirm password field” and click on “OK” button.

- The password has been set click on “OK” Button.


Labels:
Windows Tips
How to Create PDF Files
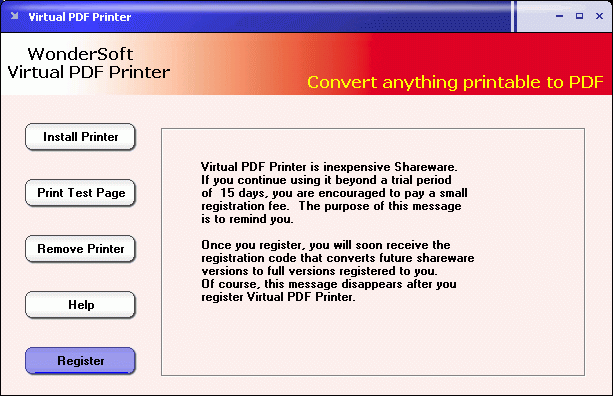
- Download a PDF printer.
- Install it.
- It will create a virtual printer, a fake printer that will show up inside your File > Print dialog.
- Reboot your machine if requested by the pdf printer.
- Open up any printing capable application.
- Choose File then Print.
- Instead of your default printer, choose the pdf printer you installed.
- At the prompt, choose whether you want a screen, print or press quality PDF.
- If your document contains only text, it won't make much difference which size, but if it contains pictures and you need your PDF to be small enough to email, choose the screen quality option.
Labels:
Windows Tips
Windows 8 Free Download
Windows 8 Editions
|
Size
|
Download
|
| Windows8-ReleasePreview-64bit-ChineseSimplified.iso Product Key: TK8TP-9JN6P-7X7WW-RFFTV-B7QPF |
3.4 GB
| |
| Windows8-ReleasePreview-32bit-ChineseSimplified.iso Product Key: TK8TP-9JN6P-7X7WW-RFFTV-B7QPF |
2.6 GB
| |
| Windows8-ReleasePreview-64bit-Arabic.iso Product Key: TK8TP-9JN6P-7X7WW-RFFTV-B7QPF |
3.3 GB
| |
| Windows8-ReleasePreview-32bit-Arabic.iso Product Key: TK8TP-9JN6P-7X7WW-RFFTV-B7QPF |
2.5 GB
| |
| Windows8-ReleasePreview-64bit-ChineseTraditionalTW.iso Product Key: TK8TP-9JN6P-7X7WW-RFFTV-B7QPF |
3.4 GB
| |
| Windows8-ReleasePreview-32bit-ChineseTraditionalTW.iso Product Key: TK8TP-9JN6P-7X7WW-RFFTV-B7QPF |
2.6 GB
| |
| Windows8-ReleasePreview-64bit-English.iso Product Key: TK8TP-9JN6P-7X7WW-RFFTV-B7QPF |
3.3 GB
| |
| Windows8-ReleasePreview-32bit-English.iso Product Key: TK8TP-9JN6P-7X7WW-RFFTV-B7QPF |
2.5 GB
| |
| Windows8-ReleasePreview-64bit-French.iso Product Key: TK8TP-9JN6P-7X7WW-RFFTV-B7QPF |
3.3 GB
| |
| Windows8-ReleasePreview-32bit-French.iso Product Key: TK8TP-9JN6P-7X7WW-RFFTV-B7QPF |
2.5 GB
| |
| Windows8-ReleasePreview-64bit-German.iso Product Key: TK8TP-9JN6P-7X7WW-RFFTV-B7QPF |
3.3 GB
| |
| Windows8-ReleasePreview-32bit-German.iso Product Key: TK8TP-9JN6P-7X7WW-RFFTV-B7QPF |
2.5 GB
| |
| Windows8-ReleasePreview-64bit-Japanese.iso Product Key: TK8TP-9JN6P-7X7WW-RFFTV-B7QPF |
3.3 GB
| |
| Windows8-ReleasePreview-32bit-Japanese.iso Product Key: TK8TP-9JN6P-7X7WW-RFFTV-B7QPF |
2.5 GB
| |
| Windows8-ReleasePreview-64bit-Korean.iso Product Key: TK8TP-9JN6P-7X7WW-RFFTV-B7QPF |
3.3 GB
| |
| Windows8-ReleasePreview-32bit-Korean.iso Product Key: TK8TP-9JN6P-7X7WW-RFFTV-B7QPF |
2.5 GB
| |
| Windows8-ReleasePreview-64bit-Portuguese-Brazil.iso Product Key: TK8TP-9JN6P-7X7WW-RFFTV-B7QPF |
3.3 GB
| |
| Windows8-ReleasePreview-32bit-Portuguese-Brazil.iso Product Key: TK8TP-9JN6P-7X7WW-RFFTV-B7QPF |
2.5 GB
| |
| Windows8-ReleasePreview-64bit-Russian.iso Product Key: TK8TP-9JN6P-7X7WW-RFFTV-B7QPF |
3.3 GB
| |
| Windows8-ReleasePreview-32bit-Russian.iso Product Key: TK8TP-9JN6P-7X7WW-RFFTV-B7QPF |
2.5 GB
| |
| Windows8-ReleasePreview-64bit-Spanish.iso Product Key: TK8TP-9JN6P-7X7WW-RFFTV-B7QPF |
3.3 GB
| |
| Windows8-ReleasePreview-32bit-Spanish.iso Product Key: TK8TP-9JN6P-7X7WW-RFFTV-B7QPF |
2.5 GB
| |
| Windows8-ReleasePreview-64bit-Turkish.iso Product Key: TK8TP-9JN6P-7X7WW-RFFTV-B7QPF |
3.3 GB
| |
| Windows8-ReleasePreview-32bit-Turkish.iso Product Key: TK8TP-9JN6P-7X7WW-RFFTV-B7QPF |
2.5 GB
| |
| Windows8-ReleasePreview-64bit-Swedish.iso Product Key: TK8TP-9JN6P-7X7WW-RFFTV-B7QPF |
3.3 GB
| |
| Windows8-ReleasePreview-32bit-Swedish.iso Product Key: TK8TP-9JN6P-7X7WW-RFFTV-B7QPF |
2.5 GB
| |
| Windows 8 Consumer Preview Online Install |
5.00 MB
| |
| Windows 8 Consumer Preview English, 64-bit (x64), ISO Product Key: DNJXJ-7XBW8-2378T-X22TX-BKG7J |
3.3 GB
| |
| Windows 8 Consumer Preview English, 32-bit (x86), ISO Product Key: DNJXJ-7XBW8-2378T-X22TX-BKG7J |
2.5 GB
| |
| Windows 8 Consumer Preview Chinese, 64-bit (x64), ISO Product Key: DNJXJ-7XBW8-2378T-X22TX-BKG7J |
3.4 GB
| |
| Windows 8 Consumer Preview Chinese, 32-bit (x86), ISO Product Key: DNJXJ-7XBW8-2378T-X22TX-BKG7J |
2.6 GB
| |
| Windows 8 Consumer Preview German, 64-bit (x64), ISO Product Key: DNJXJ-7XBW8-2378T-X22TX-BKG7J |
3.3 GB
| |
| Windows 8 Consumer Preview Germen, 32-bit (x86), ISO Product Key: DNJXJ-7XBW8-2378T-X22TX-BKG7J |
2.6 GB
| |
| Windows 8 Consumer Preview French, 64-bit (x64), ISO Product Key: DNJXJ-7XBW8-2378T-X22TX-BKG7J |
3.3 GB
| |
| Windows 8 Consumer Preview French, 32-bit (x86), ISO Product Key: DNJXJ-7XBW8-2378T-X22TX-BKG7J |
2.5 GB
| |
| Windows 8 Consumer Preview Japanese, 64-bit (x64), ISO Product Key: DNJXJ-7XBW8-2378T-X22TX-BKG7J |
3.3 GB
| |
| Windows 8 Consumer Preview Japanese, 32-bit (x86), ISO Product Key: DNJXJ-7XBW8-2378T-X22TX-BKG7J |
2.5 GB
| |
| Windows 8 Developer Preview English, 64-bit (x64), ISO |
3.6 GB
| |
| Windows 8 Developer Preview English, 32-bit (x86), ISO |
2.8 GB
|
Labels:
Windows Tips
How to speed up Windows 7 In Easy Way
Speed up Windows 7
- Note that Windows 7's Defragment feature runs automatically but if you want to control it manually, follow the next steps.
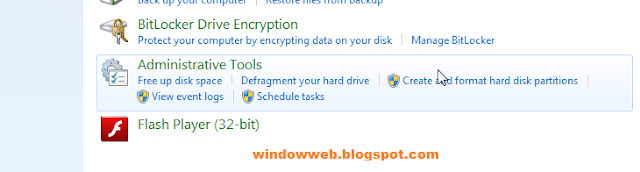
- Open the Control Panel.

- Open "System and Security".

- Click on "Defragment Your Hard Drive".

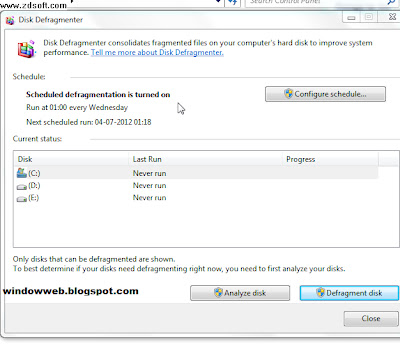
- Select a drive to analyze. For example, the "C:" drive.
- Click "Analyze Disk".
- Note that the time it takes to do the defragmentation is dependent on the size of the volume and the amount of fragmentation (red).
- While you can continue working while the defragmentation tool is running, the system response will often be very slow. Consider starting up a defrag before you retire for the evening and letting it run overnight.
- If you need to do work once the defragmentation has begun and you cannot tolerate the poor performance, pause or stop the defragmentation tool. If you stop files that have been defragmented as still consolidated. The advantage of pause is that the tool will continue where it left off when it resumes.
- Change the defragmentation schedule as follows. If you want to control the day of the week used for defragmentation, do the following:
- Click "Configure Schedule".
- Open the day menu.
- Select "Day (e.g., Sunday)".
- Click "OK".
- Click "Close".
Labels:
Windows Tips


How to Hide and Show Hidden Files
Tips to Hide Files on Windows 7

- First off, move to the containing file folder (Which file you wanna hide).
- Then right click on the file, which wanna hide.
- Then go to “Properties” of that file.
- Just bottom of properties, you can see “Attributes”.
- On the “Attributes” list, just click “Hidden” button to hide that file.
Tips to Show Files on Windows 7

- Move to your file containing folder.
- Just left top of that page, you can see an option known as “Organize”.
- Now, click that button, and then a list will appears downwards.
- From that list select “Folders and search options”. Then a dialog box will appear.
- At the top of that dialog box, you can see another button called “View”.
- Then click that button.
- On “Advanced settings” just find “Hidden files and folders”. That will be “Don’t show hidden files, folders, or drives”, just change that into “Show hidden files, folders, and drives”.
Labels:
Windows Tips
How to make Windows faster

One of the greatest things about buying a new Windows computer
is turning it on for the first time and being amazed at just how fast
it is. It starts up quickly, and when you click to open a program, it
pops up nearly instantaneously. You can run multiple programs and keep a
dozen web browser tabs open, and it still runs quickly — and it even
shuts down in a matter of seconds!
But then... your new computer starts to slow down. First, it takes a little longer to boot up, but gradually the entire system grows sluggish, and eventually it gets to the stage where you have time to make a cup of coffee while your web browser loads. Your once-snappy computer has become old.
Fortunately, by performing a few simple tasks, you can speed it back up again. You may not get it back to its good-as-new speed — and even if you do, as the state of the art marches forward, it will still seem a little slow compared to newer and more powerful equipment — but you can definitely squeeze a few more months (or even years) out of it.
Before we start
For the most part, making the current versions of Windows (especially Vista and Win7) faster will require you to disable some features. In most cases, you won't even notice these features are gone, but you should still proceed with caution. If your computer is really, really slow, it's probably better to get a handyman in to fix it — or maybe consider it time to upgrade your entire system.

First steps
To begin with, your best bet is to disable the Windows eye candy. After all, what good is a pretty interface if it's unusably slow?
Click the Start (Flag) button, right click Computer, and select Properties. Click "Advanced system settings" and then, underneath the Performance section, click the Settings button. Select the "Adjust for best performance" radio button and click OK. Click OK again and you're done. This will make Windows look rather plain — a lot like Windows 98, in fact — but it should make your computer feel a lot faster, too.
Next, we're going to disable indexing, a feature that speeds up Windows' Search functionality. If you regularly use search to find documents and photos on your hard drive, you probably want to skip this step, however.
Click the Start (Flag) button, type "indexing options" and then press Enter. Click Modify, and you'll be shown a list of locations that are indexed by your computer. Remove the check mark from all of the boxes and click OK.

Aggressive action
With those easy steps out of the way, you should now defragment and clean up your hard drive. After that, clear your computer of malware. These processes can take up to a few hours and may require that you stop using your computer while they run, but you can set them up before you go to bed and let them run overnight.
If you use a laptop or netbook, you can opt to squeeze a bit more performance out of your computer at the expense of shorter battery life; if you work with your laptop plugged in, you need not worry. Click the Start (Flag) button, type "power options" and press Enter. On the next screen, select the "High performance" radio button. Desktop users can also enable "High performance," but the performance boost will probably be less dramatic. You can also customize your power plan to change behaviors based on whether your computer is operating on AC or battery power; we'll cover doing that another time.

Finishing touch
Finally, we're going to disable programs that automatically run when your computer starts. This can be a little dangerous, but it's also one of the best ways to speed up your computer — so proceed with caution!
Click the Start (Flag) button, type "msconfig" and press Enter. Click the Startup tab and you will see a (probably huge) list of programs that load when you start your computer up. Now... the trick is to disable as many non-important programs as possible. The problem is, there's no hard-and-fast way to work out which programs are non-essential. Basically, if it sounds important, don't disable it. If the program has "monitor" in the name or "updater", you can go ahead and disable it. If there's anything you don't recognize, go ahead and disable that too. If you're unsure, you can type the name of the program into Google — you'll be surprised at the wealth of information that you can find, even about the most esoteric of Startup items.
When you're done, click OK. The next time you turn on or reboot your computer, it should boot up a lot faster.
But then... your new computer starts to slow down. First, it takes a little longer to boot up, but gradually the entire system grows sluggish, and eventually it gets to the stage where you have time to make a cup of coffee while your web browser loads. Your once-snappy computer has become old.
Fortunately, by performing a few simple tasks, you can speed it back up again. You may not get it back to its good-as-new speed — and even if you do, as the state of the art marches forward, it will still seem a little slow compared to newer and more powerful equipment — but you can definitely squeeze a few more months (or even years) out of it.
Before we start
For the most part, making the current versions of Windows (especially Vista and Win7) faster will require you to disable some features. In most cases, you won't even notice these features are gone, but you should still proceed with caution. If your computer is really, really slow, it's probably better to get a handyman in to fix it — or maybe consider it time to upgrade your entire system.
First steps
To begin with, your best bet is to disable the Windows eye candy. After all, what good is a pretty interface if it's unusably slow?
Click the Start (Flag) button, right click Computer, and select Properties. Click "Advanced system settings" and then, underneath the Performance section, click the Settings button. Select the "Adjust for best performance" radio button and click OK. Click OK again and you're done. This will make Windows look rather plain — a lot like Windows 98, in fact — but it should make your computer feel a lot faster, too.
Next, we're going to disable indexing, a feature that speeds up Windows' Search functionality. If you regularly use search to find documents and photos on your hard drive, you probably want to skip this step, however.
Click the Start (Flag) button, type "indexing options" and then press Enter. Click Modify, and you'll be shown a list of locations that are indexed by your computer. Remove the check mark from all of the boxes and click OK.
Aggressive action
With those easy steps out of the way, you should now defragment and clean up your hard drive. After that, clear your computer of malware. These processes can take up to a few hours and may require that you stop using your computer while they run, but you can set them up before you go to bed and let them run overnight.
If you use a laptop or netbook, you can opt to squeeze a bit more performance out of your computer at the expense of shorter battery life; if you work with your laptop plugged in, you need not worry. Click the Start (Flag) button, type "power options" and press Enter. On the next screen, select the "High performance" radio button. Desktop users can also enable "High performance," but the performance boost will probably be less dramatic. You can also customize your power plan to change behaviors based on whether your computer is operating on AC or battery power; we'll cover doing that another time.
Finishing touch
Finally, we're going to disable programs that automatically run when your computer starts. This can be a little dangerous, but it's also one of the best ways to speed up your computer — so proceed with caution!
Click the Start (Flag) button, type "msconfig" and press Enter. Click the Startup tab and you will see a (probably huge) list of programs that load when you start your computer up. Now... the trick is to disable as many non-important programs as possible. The problem is, there's no hard-and-fast way to work out which programs are non-essential. Basically, if it sounds important, don't disable it. If the program has "monitor" in the name or "updater", you can go ahead and disable it. If there's anything you don't recognize, go ahead and disable that too. If you're unsure, you can type the name of the program into Google — you'll be surprised at the wealth of information that you can find, even about the most esoteric of Startup items.
When you're done, click OK. The next time you turn on or reboot your computer, it should boot up a lot faster.
Labels:
Windows Tips
Download Windows 7 from official Microsoft site
After failing(stats won’t reveal) with Windows Vista, Microsoft has switched all its attention towards it upcoming Windows version called “Windows7″. After leaking its RC1(deliberately), Microsoft released Windows7 first beta officially for 2.5 million users initially. Windows users from around the globe shown great interest in 1st beta of Windows7 and massive downloading resulted in crashing the download site. Keeping in view the interest shown by users, Microsoft arranged an unlimited number of downloads for users. Windows 7 beta can be downloaded directly from the following links:
Windows 7 beta for 32bit systems
Windows 7 beta for 64bit systems

Following are the activation keys for Windows 7 beta:
For 32bit release:
6JKV2-QPB8H-RQ893-FW7TM-PBJ73QXV7B-K78W2-QGPR6-9FWH9-KGMM7
GG4MQ-MGK72-HVXFW-KHCRF-KW6KY
TQ32R-WFBDM-GFHD2-QGVMH-3P9GC
4HJRK-X6Q28-HWRFY-WDYHJ-K8HDH
Windows 7 Beta Activation Keys (64-bit)
For 64bit:
JYDV8-H8VXG-74RPT-6BJPB-X42V4482XP-6J9WR-4JXT3-VBPP6-FQF4M
7XRCQ-RPY28-YY9P8-R6HD8-84GH3
D9RHV-JG8XC-C77H2-3YF6D-RYRJ9
RFFTV-J6K7W-MHBQJ-XYMMJ-Q8DCH
Labels:
Windows Tips


