Get our toolbar!

Peoples in now

"Hai My Friends .Your Comments are My Blog Life
Impression So Please Give Your All Comments"

Top Songs Of 2012

The song has received positive reviews from critics who complimented the song’s effective lyrics and chorus, and commended Ludacris’ part and the song’s ability to have an urban twist.

Most Visited Websites 2011-2012

Google Search or Google Web Search is a web search engine owned by Google Inc. Google Search is the most-used search engine on the World Wide Web, receiving several hundred million queries each day through its various services.

History of Facebook

Mark Zuckerberg wrote Facemash, the predecessor to Facebook, on October 28, 2003, while attending Harvard as a sophomore. According to The Harvard Crimson, the site was comparable to Hot or Not, and "used photos compiled from the online facebooks of nine houses.

Airtel 3G 70% less in Kerala Plans

First time users please follow the steps as given below to go 3G in Kerala:- » Select network settings to "automatic" on your handset » Choose "3G only mode" and wait for network registration. » After registration and seeing 3G network on your handset, Select "Dual Mode" or "3G and 2G mode" to enjoy 3G .

Aakash Tablet is Available For Booking

You can Order your Aakash Tablet now. The long wait for Aakash Tablet is now over. Now you can book your Aakash Tablet online which will be delivered within a week from the day of booking. Aakash was the most awaited Indian Tablet, which took many people’s attention all over the world.

Showing posts with label Blog Tricks. Show all posts

Remove Blogger Nav bar Completely
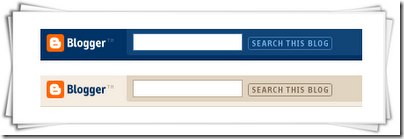

Remove Blogger Nav bar Completely 

image
Blogger has got a default Navigation Bar. This navigation bar is hidden in most of the third party templates. Instead of hiding the nav bar using CSS, we can completely remove it.
To do that
1. Login to your Blogger account and navigate to Layout > Edit HTML
2. In the Template Code find <body> and just above that add the following Code.
<!--<body>-->
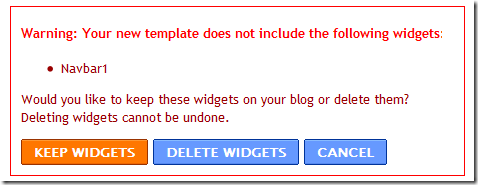
3. Now Save the Template and you will see a confirmation about deleting the Navbar Widget. Confirm the Deletion by Clicking on the Delete Widgets Button
image
4.Now your Nav bar is completely removed from your Blog.

Advantages of this Method

You will be completely removing the nav bar and not hiding it. The nav bar iframe codes wont be present in your blog’s HTML source and so the blog  would be more Search Engine Friendly and your blog will have a more valid XHTML code..

Disadvantages of this Method

You will no longer see the Quick Edit pencil image  or wrench links quick-edit-wrench-blogger  on your blog even if you are logged in. This is not a a big deal. You can Edit the Widgets from the Layout >Page Elements Page. You wont see the Comment Delete icon near your comments even if you are logged in.But you can definitely manage the comments from the Blogger Comment Tab.It would also be a good idea to completely remove the Quick Edit and Wrench Links from Blogger

How to Get back the Nav Bar?

If you followed this method to remove the nav bar and now want to get it back, then  delete the extra code that you added. i.e remove the code from step 2, that you added into your template and Save the Template.


Facebook Like Box For Blogger

Facebook Like Box For Blogger

Facebook Like Button allows you to provide more Sharing Options to your Readers. Your readers can share your posts on Facebook using the Like Button. Have you added the Like button and still not getting any “Likes”? :(. Ok then we will present the Like button in a much better and elegant way.
Here is a Screenshot of the Facebook Like Box. Isn’t it lovely and more “Likable” than the default Like Button?
image
The  Facebook Like box also includes a link to  your Facebook Fan Page. This FB Like Box was Designed Styled and coded by Mia of Dezign Matterz .  Thanks to her for designing and styling  this awesome Like Box.

How to install the Facebook Like Box?

1. First Fill in the following Details (Code will be updated with these details)
Width of the Like Box                      (Enter the appropriate width of the FB like box) 
Facebook Fan Page / Profile URL 
2. Now Login to your Blogger Account and navigate to Design > Edit HTML and check the option which says “Expand Widget Templates”
3. Look for  ]]></b:skin> in your template and just above that place the following code (You can use Ctrl +F to find the code).
.fb_like_box {
margin-top:10px;
-moz-border-radius:10px 10px 10px 10px;
border-radius:10px;
background-color:#3B5999;
border:3px solid #2B2B2B;
margin-bottom:10px;
padding:10px 7px;
width:540px;
}
.fb_like_top {
overflow:visible;
padding:0;margin:0 0 5px;
width:349px;
height:24px;
background:url("http://lh5.ggpht.com/_u4gySN2ZgqE/TJ3dpjy9PaI/AAAAAAAABr0/PTUXIS8ykps/fblogo%5B3%5D.jpg") no-repeat scroll left top transparent;
}
.fb_like_button_holder {
-moz-border-radius:10px 10px 10px 10px;
border-radius:10px;
background:none repeat scroll 0 0 #FFFFFF;
padding:12px 12px 0 12px;
width:515px;
height:42px;
}
4. Now Look for <data:post.body/> in your template and just below that add the following code.
<b:if cond='data:blog.pageType == &quot;item&quot;'>
<div class='fb_like_box'>
<div class='fb_like_top'></div>
<div class='fb_like_button_holder'>
<b:if cond='data:post.isFirstPost'> 
<script>(function(d){
  var js, id = 'facebook-jssdk'; if (d.getElementById(id)) {return;}
  js = d.createElement('script'); js.id = id; js.async = true;
  js.src = "//connect.facebook.net/en_US/all.js#xfbml=1";
  d.getElementsByTagName('head')[0].appendChild(js);
}(document));</script>
</b:if> 
<fb:like expr:href="data:post.canonicalUrl" layout='standard' send='true' show_faces='false' width="450" font="arial" action="like" colorscheme="light"></fb:like>
</div>
</div>
</b:if>
5.Next you have to add the fb namespace to your template tag.Your template should have the specification for the fb tag that you have used. The following namespace declaration will take care of that. To declare the namespace, find
<html
and change it to
<html xmlns:fb="https://www.facebook.com/2008/fbml"
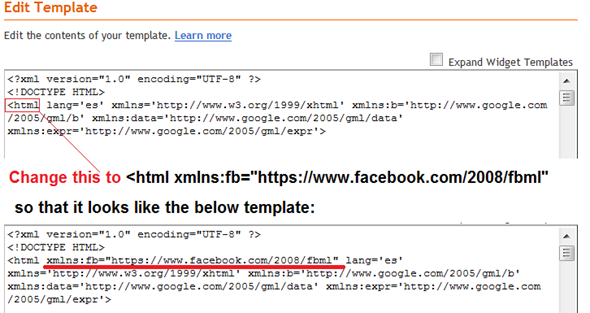
The following screenshot will help you out.
imageThis is necessary for all FBML widgets using the fb tag.  So if you have already added the namespace while adding some other FB plugin, then you can skip this.
6. Now Save your template and you will see a Facebook Like Box on your post pages.


Add Google Plus One Button on Blogger

Add Google Plus One Button on Blogger

Add Google Plus One ( +1 ) Button on Blogger

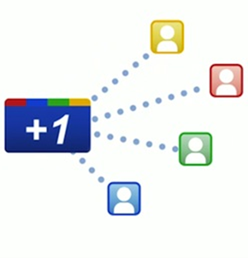
Google has released an alternative to the Facebook and Twitter Sharing buttons named +1.If you like something that you find on the web, you can hit the +1 button, and your +1'swill help friends, contacts, and others on the web find the best stuff when they search. This tutorial will guide you on adding the same to your Blogger Blog.

Why Should I add the Google +1 Button?

1. The Plus one button will have a  major impact on your Search results. When a friend of yours does a search in Google, your +1s will count.
2. You can get a detailed report about the +1 metric and how it affects your search traffic over at Webmaster Tools. You can read more about it at the Official Google Webmaster Blog - http://googlewebmastercentral.blogspot.com/2011/06/1-reporting-in-google-webmaster-tools.html

Adding Google Plus one (+1) button to Blogger

1. If you are already using the official Blogger Sharing buttons, you should  already be seeing the +1 buttons on your blog. If it is not, then  go to that tutorial, and you will get the answer to how you can fix it.
2. No I don’t want to add those Blogger Sharing buttons, but would love to add the +1 button somehow. If that’s the case, then read on..
3.Generate the Google +1 button code using the following generator.(The codes and the tutorial will be updated with the options that you make using the generator)
Configure the ButtonDemo
Button Type
Language
Float
Location of the Button
Display

4. Go to Blogger Dashboard > Design > Edit HTML and click on the button which says “Expand widget Templates”. Look for </head> and immediately above that paste
<script type="text/javascript" src="http://apis.google.com/js/plusone.js">
{lang: 'en-US'}
</script>
5. Now look for <data:post.body/> and immediately below that paste
<div>
<g:plusone size="standard" expr:href="data:post.canonicalUrl"/>
</div>
6.Save the template, and you should see the Google  +1 buttons on your blogger blog.
You think its cool?, then  +1 it :P 


Grid Layout For the Popular Posts Widget

Grid Layout For the Popular Posts Widget

A few days back, I published the JavaScript version  of the Recent Posts widget, and I loved the Grid Layout of the Widget. One of the most popular Widgets used by Bloggers is Blogger’s Official Popular Post Widget. So I decided to edit the gadget, and give it the Grid Style.

How does the Gadget Look like after tweaking it?

imageimage
So Here are the Steps to make your Popular Posts Widget act like an Image Grid
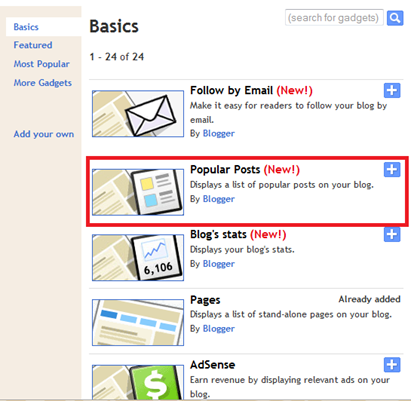
1. Go to the Layout Page and add the Popular Posts Gadget, if you haven’t already added it.
image
2. Edit the Gadget Settings so that it displays the Thumbnails and not the Snippet
image
3. Now Go to Template/Design > Edit HTML . DO NOT Click on the Expand Widget Templates checkbox. Leave it unchecked, and look for  PopularPosts1 (Do a Ctrl +F to find it in your template) and you will get some line like this
<b:widget id='PopularPosts1' locked='false' title='Popular Posts' type='PopularPosts'/>
4. Change This line to
<b:widget id='PopularPosts1' locked='false' title='Popular Posts' type='PopularPosts'>
<b:includable id='main'>
  <b:if cond='data:title'><h2><data:title/></h2></b:if>
  <div class='widget-content popular-posts'>
    <ul>
      <b:loop values='data:posts' var='post'>
      <li>
        <b:if cond='data:showThumbnails == "false"'>
          <b:if cond='data:showSnippets == "false"'>
            <!-- (1) No snippet/thumbnail -->
            <a expr:href='data:post.href'><data:post.title/></a>
          <b:else/>
            <!-- (2) Show only snippets -->
            <div class='item-title'><a expr:href='data:post.href'><data:post.title/></a></div>
            <div class='item-snippet'><data:post.snippet/></div>
          </b:if>
        <b:else/>
          <b:if cond='data:showSnippets == "false"'>
            <!-- (3) Show only thumbnails -->
            <div class='item-thumbnail-only'>
              
                <div class='item-thumbnail'>
   <a expr:href='data:post.href' expr:title='data:post.title'>
    <b:if cond='data:post.thumbnail'>
                    <img alt='' border='0' expr:height='data:thumbnailSize' expr:src='data:post.thumbnail' expr:width='data:thumbnailSize'/>
       <b:else/>
        <img alt='' border='0' expr:height='data:thumbnailSize' src='http://2.bp.blogspot.com/-erTXCq61ULM/TmHYAQBZ0GI/AAAAAAAACCs/6cBX54Dn6Gs/s72-c/default.png' expr:width='data:thumbnailSize'/>
       </b:if>
                  </a>
                </div>         
             </div>
            <b:else/>
            <!-- (4) Show snippets and thumbnails -->
            <div class='item-content'>
              <b:if cond='data:post.thumbnail'>
                <div class='item-thumbnail'>
                  <a expr:href='data:post.href' target='_blank'>
                    <img alt='' border='0' expr:height='data:thumbnailSize' expr:src='data:post.thumbnail' expr:width='data:thumbnailSize'/>
                  </a>
                </div>
              </b:if>
              <div class='item-title'><a expr:href='data:post.href'><data:post.title/></a></div>
              <div class='item-snippet'><data:post.snippet/></div>
            </div>
            <div style='clear: both;'/>
          </b:if>
        </b:if>
      </li>
      </b:loop>
    </ul>
    <b:include name='quickedit'/>
  </div>
</b:includable>
</b:widget>
5. Save your Template
6. Now Go to Template Designer > Advanced > Add CSS and paste the following CSS snippet there, and apply to your Blog
.popular-posts .item-thumbnail{float:left;}
.popular-posts ul{padding-left:0px;}
.popular-posts ul li {list-style-image: none;list-style-type: none;display:inline;}

The image URL present in the Widget Code is the Default Thumbnail which will be displayed if the post doesn’t have a thumbnail associated with it. You can modify it to get a custom default thumbnail. You can spice up the CSS to make the grid look more eye catching. I would leave that to you :)

Reverting Back to the old one

If you are not satisfied by the way it looks, then revert it back. Here are the steps:
  1. Just Remove the Popular Posts Widget from the Layout Page.If you need the original version, then add it back again
  2. Remove the CSS which you added to Template Designer > Advanced > Add CSS
  3. That’s it.
I think that this Hack would work out well on Recipe and Photography Blogs. Try it out, and let me know if it is useful :)


Official Sharing Buttons on Blogger


Official Sharing Buttons on Blogger

image
Blogger has been rolling out new features to improve the looks and usability of the blogs. Blogger is now testing out a new Social Sharing icon set consisting of Email, Blogger,Twitter(with goo.gl shortener),Facebook and Google buzz buttons. The set looks simple and elegant with some cool mouse over effects. These Sharing buttons are now available in your regular dashboard.If you need to take a peek at these new sharing icons, then take a look at my post page(and try sharing it :P ).
You are still reading. So i guess that you are really interested in implementing these Sharing buttons on your Blogger Blog.
Then don’t wait. Just follow these simple steps
  1. Login to Your Blogger Dashboard
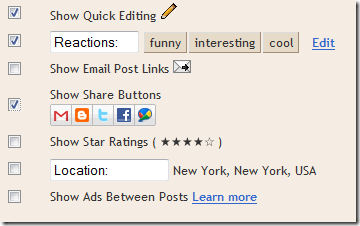
  2. Go to Design > Page Elements and Click on the Edit Button near the Blog Posts Gadget and check the “Show Share Buttons” Optionimage
  3. You can Drag and Drop the Share buttons and place it where you want.image
  4. Now if everything went right, then you should be able to see the Share buttons on your Blog. If not then read on. :)
  5. If it didn’t appear then don’t worry, That is because you are having a modded template. Just Go to the Edit HTML page under the Design Tab , Check the “Expand Widget Templates” Option and locate
    <p class='post-footer-line post-footer-line-3'>
    Or if that is not there then find
    <div class='post-footer-line post-footer-line-3'>
    Or if that is not there then find
    <data:post.body/>
    and place the following code just below any of these lines[whichever is present in your template].
    <div class='post-share-buttons'>
      <b:include data='post' name='shareButtons'/>
    </div>
    and Save your template.

Google + 1 Button Doesn’t show up

1. If it doesn’t show up, then replace the share button code first.To do that, look for
<b:includable id='shareButtons' var='post'>
in your template. Now delete everything including this line, till the very next occurrence of
</b:includable>
(including this line)
Now we can add a new b:includable block there. So paste the following code there instead of the old b:includable block
<b:includable id='shareButtons' var='post'>
  <b:if cond='data:top.showEmailButton'><a class='goog-inline-block share-button sb-email' expr:href='data:post.sharePostUrl + &quot;&amp;target=email&quot;' expr:title='data:top.emailThisMsg' target='_blank'>
      <span class='share-button-link-text'><data:top.emailThisMsg/></span>
  </a></b:if><b:if cond='data:top.showBlogThisButton'><a class='goog-inline-block share-button sb-blog' expr:href='data:post.sharePostUrl + &quot;&amp;target=blog&quot;' expr:onclick='&quot;window.open(this.href, \&quot;_blank\&quot;, \&quot;height=270,width=475\&quot;); return false;&quot;' expr:title='data:top.blogThisMsg' target='_blank'>
      <span class='share-button-link-text'><data:top.blogThisMsg/></span>
  </a></b:if><b:if cond='data:top.showTwitterButton'><a class='goog-inline-block share-button sb-twitter' expr:href='data:post.sharePostUrl + &quot;&amp;target=twitter&quot;' expr:title='data:top.shareToTwitterMsg' target='_blank'>
      <span class='share-button-link-text'><data:top.shareToTwitterMsg/></span>
  </a></b:if><b:if cond='data:top.showFacebookButton'><a class='goog-inline-block share-button sb-facebook' expr:href='data:post.sharePostUrl + &quot;&amp;target=facebook&quot;' expr:onclick='&quot;window.open(this.href, \&quot;_blank\&quot;, \&quot;height=430,width=640\&quot;); return false;&quot;' expr:title='data:top.shareToFacebookMsg' target='_blank'>
      <span class='share-button-link-text'><data:top.shareToFacebookMsg/></span>
  </a></b:if><b:if cond='data:top.showOrkutButton'><a class='goog-inline-block share-button sb-orkut' expr:href='data:post.sharePostUrl + &quot;&amp;target=orkut&quot;' expr:title='data:top.shareToOrkutMsg' target='_blank'>
      <span class='share-button-link-text'><data:top.shareToOrkutMsg/></span>
  </a></b:if><b:if cond='data:top.showBuzzButton'><a class='goog-inline-block share-button sb-buzz' expr:href='data:post.sharePostUrl + &quot;&amp;target=buzz&quot;' expr:onclick='&quot;window.open(this.href, \&quot;_blank\&quot;, \&quot;height=415,width=690\&quot;); return false;&quot;' expr:title='data:top.shareToBuzzMsg' target='_blank'>
      <span class='share-button-link-text'><data:top.shareToBuzzMsg/></span>
  </a></b:if>
  <b:if cond='data:top.showDummy'>
    <div class='goog-inline-block dummy-container'><data:post.dummyTag/></div>
  </b:if>
</b:includable>
2.Save the template, and see if the Plus One button is showing up.If it is then you are done. Otherwise proceed to step 3.
3. Locate
</head>
and just above that paste the following code
<script src='https://apis.google.com/js/plusone.js'/>
and Save the template.Now you should see the +1 buttons on your blog.

Optional Tweaks

  1. Show the Sharing Buttons on Post pages only - Find the Following Code in your template
    <div class='post-share-buttons'>
      <b:include data='post' name='shareButtons'/>
    </div>
    and wrap it within conditional tags as
    <b:if cond='data:blog.pageType == &quot;item&quot;'>
    <div class='post-share-buttons'>
      <b:include data='post' name='shareButtons'/>
    </div>
    </b:if>
  2. Hide Some of the Sharing Buttons – If you want you can hide some of these buttons using CSS. For example to hide the Blogger sharing button, add the following code above ]]></b:skin> in your template
    .sb-blog{display:none}
    sb-email , sb-twitter, sb-facebook, sb-buzz and sb-blog are the different Button Classes. If you hide the mail or buzz buttons, then it might look a little bad as these have rounded edges,
  3. How to add the text “Share this:” before the Share Buttons? – This was one of the questions asked in the comments.So here is how to do it.Go to Design > Edit HTML and “Expand Widget Templates”.Look for
    <b:includable id='shareButtons' var='post'>
    Just below that add
    <table border='0'><tr><td><b>Share this : </b></td><td>
    Now Look for the first occurrence of
    </b:includable>
    that comes after that. Just above that add
    </td></tr></table>

Got into Trouble with implementing the sharing buttons? Ok leave a comment here and i will try to help you out. :)

How to Add Tweet Box to Blogger


How to Add Tweet Box to Blogger

Official-Twitter-Share-Buttons-for-Blogger

It has been a long time since @Twitter released the @AnyWhere Developer Tool. AnyWhere allows you to seamlessly integrate Twitter into your site using a few lines of JavaScript. You can read more about it at  @AnyWhere Developer Page. Tweet Box is one such @AnyWhere Application, which allows you to add a 140 char Tweet Box onto your blog.
Here is a screen shot of how the Tweet box appear on my Previous Post.
image
Hope that now you got a good idea of how this works, If not scroll down to the bottom of the post and see it in live action :)

How to add the Tweet Box on a Blogger Blog?

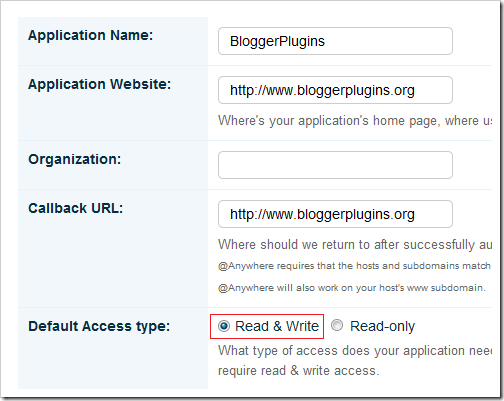
1. Go to the @AnyWhere Developers Page and create an Application there with your blog details.
image
Make Sure that you have checked the Read & Write Option when you Register your Application
2.When you complete the signup process, you will get some JavaScript codes, with a unique
 API Key
Copy out the JavaScript from there(the code in the red box) as shown in this Screenshot.
image
3.Now Login to your Blogger Dashboard and navigate to the Edit HTML Tab under Design
and “Expand your Widget Templates
4.Look for
</head>
and paste the copied Twitter JavaScript just above that line and save the template. 5.Now look for
<data:post.body/>
and immediately below that paste the following JavaScript Code and save your template.
 (Editable parts are shown in red)
<b:if cond='data:blog.pageType == &quot;item&quot;'>
<div id='bp_tweetBox'/>
<script type='text/javascript'>
bp_tweet_link=&quot;<data:post.url/>&quot;;
twttr.anywhere(function (T) {
T(&quot;#bp_tweetBox&quot;).tweetBox({
width: 560,
label: &quot;Share the L&#10084;ve  &amp; Retweet&quot;,
defaultContent: &quot;RT @bloggerplugins <data:post.title/>&quot;+&quot;
 &quot;+bp_tweet_link
});
});
</script>
</b:if>
Now you should see the Tweet Box on all of your post pages

Currently, this doesn’t do any URL shortening . You can expect that it my next post. I will  also try to post about the other @AnyWhere features soon :)
Share your opinions and if you have any questions about the tweet button, feel free to ask :)

Alternate Comment Forms For Blogger

Alternate Comment Forms For Blogger

.JS-Kit (Echo)
js-kit  This is also another JavaScript based commenting system.Echo offers both free and paid packages!The free package comes with threaded comments and an interface where the commenter can add videos,images,similes, etc.The commenter can also format his comments using a simple WYSIWYG comment editor.
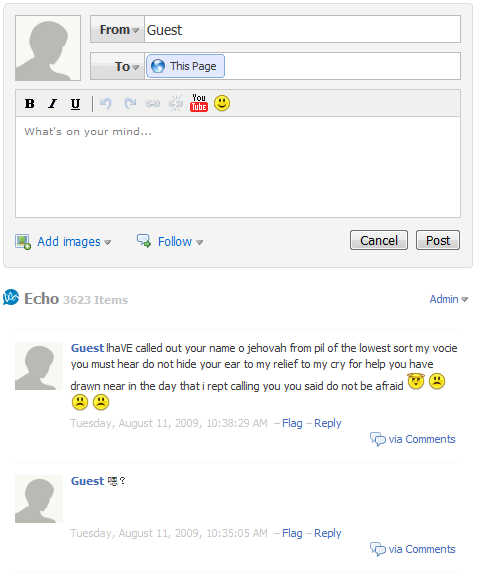
js-kit-commenting system
When you try to go for any of these commenting systems,make sure that you backup your template and keep a copy,so that you can revert back if it didn’t work out well.
These are the three most popular commenting systems.They come with threaded commenting with Gravatar based profile images,which can make you commenting system look more professional.I personally prefer Intense Debate over the others.
So if you want to remove the default blogger commenting system and get a better commenting interface,then you can opt for any of these commenting systems.
Note: These comment forms come with an option to show the comment form on new posts only(means posts with 0 blogger comments)!That means your old comments will stay intact and will use the old blogger comment form.(This is optional.. you can also revert all posts to use the new commenting system.But in that case, you cant display the existing comments easily..)